Developing Custom workflows in SharePoint 2007 using Visual Studio 2005
There are two types of custom workflows we can develop in SharePoint 2007
1. SharePoint Designer workflows: These workflows are developed using SharePoint Designer 2007.
2. Visual Studio Designer workflows: These workflows are developed using Visual studio Designer for which we need to install Visual Studio 2005 Extensions for Windows Workflow Foundation.
In this article I am going to explain about how to develop custom workflows using Visual Studio 2005 using InfoPath 2007 forms as Task forms.


7. Insert “Button” and change the label as “Approve”, insert another button and change the label as “Reject” by changing the button properties.
8. Insert another text box on to the form; change the name as “TaskStatus”.
9. Create a submit Data Connection
· On the Tools Menu click on “Data Connections” as shown below:

· In the “Data Connections” wizard click on “Add”.

 VIII. “Select a field or group” wizard appears, Select “TaskStatus” from “myfields”.
 IX. Set value as “Approved” for “Value” field as shown below and click “OK”:

 11. Now save the form template, I am saving it as “My Workflow Task Form”.
14. Under Security Level, clear the “Automatically determine security level” check box, and then click Domain.
 15. Click OK to save the changes and close the Form Options dialog box.
Create workflow
 5. Name the project, and then click OK.

 8. Select Create Task activity and view properties.


 24. Drag and drop the “IfElseActivity” from the toolbox.
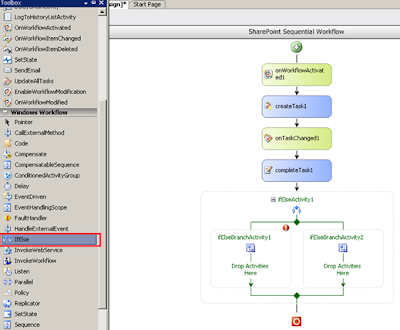
25. Drag and drop “send Email” activities on to the both branches of the “IfElseActivity”.
 26. Select “IfElseBranchActivity1” and view the properties, Click on the “Condition” property and select “Code Condition” from the dropdown.
 28. As soon as you enter the name of the function a method gets created with name given by you.(In My case it is “IFApproved”).


In the Extended properties [“”], give the field name what we have created in the InfoPath Task form.

1. SharePoint Designer workflows: These workflows are developed using SharePoint Designer 2007.
2. Visual Studio Designer workflows: These workflows are developed using Visual studio Designer for which we need to install Visual Studio 2005 Extensions for Windows Workflow Foundation.
In this article I am going to explain about how to develop custom workflows using Visual Studio 2005 using InfoPath 2007 forms as Task forms.
Design a Task form using InfoPath 2007
1. Open Microsoft Office InfoPath 2007
2. Click on “Design a Form Template” under “Design a Form” as shown below:

3. Select “Form Template” and also ensure that “Enable Browser compatible features only” check box is selected, select blank template and click “OK”.

4. In the “Design Tasks” pane, select “Controls”
5. Insert “Textbox” control on to the page.
6. Right click on the inserted textbox and click on “Textbox properties”, change the “Field name” as “Comments”, click “OK”.5. Insert “Textbox” control on to the page.
7. Insert “Button” and change the label as “Approve”, insert another button and change the label as “Reject” by changing the button properties.
8. Insert another text box on to the form; change the name as “TaskStatus”.
9. Create a submit Data Connection
· On the Tools Menu click on “Data Connections” as shown below:

· In the “Data Connections” wizard click on “Add”.
· Select “Create a new connection to:” and select “Submit data”


· Click “Next”
· U need to submit your forms data to hosting environment, Select radio button “To the hosting environment, such as ASP.NET page or hosting application”.


· Click “Next” then click “Finish” and then “Close”
10. Now add “Rules” to the button.
· Rules for “Approve” button:
I. Right click the button you added to the Task form, and then select Button Properties.
II. In the Button Properties dialog box, On the General tab, click Rules.

III. Rules dialogue box is opened, In the Rules dialog box, click “Add”.
IV. In the Rule dialog box, click Add Action, and then select “Submit using a data connection”.
V. Select “Submit” (or the data connection created earlier) under “Data Connection” then click “OK”.
VI. Add another rule to the button, On the Rules dialog box, click Add, then click Add Action.
VII. Select “Set a field’s value”, click on the icon(red marked below)


X. Add another rule to the button, On the Rules dialog box, click Add, then click Add Action.
XI. Select Close the Form from the list, then click “OK” on all the open dialogue boxes.
· Rules for “Reject” button: Follow the same steps from I to XI for “Reject” button. For step IX set the value as “Rejected” for Value field.

12. On the Tools menu, click Form Options.
13. In the Form Options wizard, under Category list, click Security and Trust.14. Under Security Level, clear the “Automatically determine security level” check box, and then click Domain.

Create workflow
2. On the File menu, select New, and then select Project.
3.In the New Project window, click to expand the Visual C# then select SharePoint option.
4.In the Templates pane, select SharePoint Server Sequential Workflow.

Using Workflow activities and setting properties.
6. Open Workflow1.cs file, it has “OnWorkflowActivated” activity by default and it has the name as “OnWorkflowActivated1” as shown below:

7. Drag and drop “Create Task” activity from Toolbox.

9. Set “Correlation Token” value as “tasktoken” (Correlation token is unique identifier for each “Create Task” activity used which enables to route data to appropriate task).
10. If another “Create Task” activity is used then give another name to the “Correlation token”
11. Set “OwnerActivity Name” as “Workflow1” (as “Create Task” activity is not placed inside any other activity, If Create Task activity is placed inside other activity the “OwnerActivity Name” will be the name of the activity in which the “Create Task” activity is placed).
12. For “TaskId” property, click on the small icon shown beside the “TaskId” property when clicked on it.

13. A wizard will be opened, click on “Bind to a new member” tab and then select “Create Field” radio button and click “OK”.

14. Similarly set the value of the “TaskProperties” property.
15. Drag and drop the “OnTaskChanged” activity from toolbox.
16. Set “CorrelationToken” as “tasktoken” which is created before and Set “OwnerActivity Name” as “Workflow1”.
17. For “After Properties” and “BeforeProperties” follow steps 12 and 13.
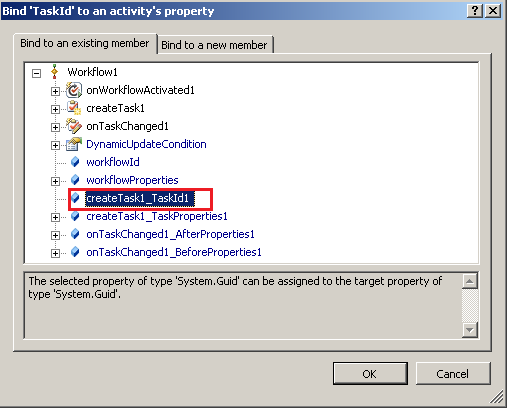
18. For “TaskId” property click on the small icon shown beside it.
19. A wizard is opened, on the “Bind to an existing member” tab select the “Task Id” property created for “Create Task” activity.
20. Drag and drop “Complete Task” activity.
21. Set “CorrelationToken” as “tasktoken” which is created before and Set “OwnerActivity Name” as “Workflow1”.
22. For “TaskId” property click on the small icon shown beside it.
23. A wizard is opened, on the “Bind to an existing member” tab select the “Task Id” property created for “Create Task” activity.
23. A wizard is opened, on the “Bind to an existing member” tab select the “Task Id” property created for “Create Task” activity.


25. Drag and drop “send Email” activities on to the both branches of the “IfElseActivity”.
27. Click on the “+” icon beside the “Condition” property and enter name for function (in my case “IFApproved”) to get execute when workflow comes to this IfElseBranch.
29. Similarly follow the steps 26 and 27 for “IfElseBranchActivity2”.
30. For both ”Send Email” follow the steps given below:
· Set “Correlation Token” as “workflow Token” and “OwnerActivityName” as “Workflow1”
· Enter name in the “Method invoking” for both the email activities.

31. Now save the project
Writing code for Activities
1. Double click on the “CreateTask” activity; a method will be created in the code file of the workflow.
The code inside the method to create and assign the task will be as shown below:

“SendEmailNotification” when set to true will send a mail alert when task is created for the user.
2. Declare a string variable.
3. Now double click on the “OnTaskChanged” activity, a method will be created in the code file.
The code inside this method will get the “TaskStatus” value which we have set in the InfoPath Task form.
In the Extended properties [“”], give the field name what we have created in the InfoPath Task form.
4. Now go to “IFApproved” Method created in the “IfElseBranchActivity1”,the code of this method will be:

· Check if the “strTaskStatus” value is “Approved”( as we have set the “TaskStatus” value in the InfoPath Task form as “Approved” when clicked on “Approve” button) , if yes then set the value of e.Result to “true”(this makes workflow to get inside the IfElseBranchActivity1 and execute the remaining code).
5. Similarly go to “IFRejected” ” Method created in the “IfElseBranchActivity2”,the code of this method will be:
6. Now go to the methods created for Sendemail activities and set the following properties as shown below:
workflowProperties.Originator will send the mail user who has raised a request for approval.
With this our code for Workflow is complete. Save and build the workflow project.
Now we have to deploy our workflow.
Deploying Custom Workflow
1. The first step in deployment of the workflow is publishing the InfoPath Task forms we have created.
2. Open the InfoPath Task form and click “Publish” on the file menu.
3. In the Publishing Wizard select option “To a network location” and click “Next”.
4. Browse to the location where (Anywhere on the hard disk. In my case I am publishing it to the folder FeatureFiles in the Workflow solution) you want to publish the form.
5. Enter the name as “MyTaskForm” and click “Next”, remove the file location from this screen and then click “Next”. Click “OK” when prompted.
6. Click Publish, and Close.
Now go to Workflow solution, in this we get folder structure as shown below:
7. We get the above structure based on “workflow project Template” we select. If project template is selected from the “SharePoint” tab then we get “Deployment Files” folder already created. If we select project template from “workflow” tab then the above folders will not be there in the solution and deploying this workflow is little different (This process I will discuss it in the last section of this article).
8. The advantage of the Project template under “SharePoint” tab is that we can directly publish the Task forms in to the “DeploymentFiles” folder which comes readymade with the solution and if we build the solution then workflow automatically gets deployed in to the server without having to write a bat file.
9. In “PostBuildActions.bat” file change the url of the site on which the workflow has to be deployed and activated.
10. Open the “feature.xml” and “workflow.xml” from “FeatureFiles”.
Code in Feature.xml file
1. Right click on the “feature.xml” and insert code snippet of the feature file.
2. Change the “feature Id” by creating the new guid using “Create Guid” in Tools menu of Visual studio.
3. Build the solution.
4. Drag and drop the dll from Debug/Bin folder of solution to assembly.
5. Open the assembly to get the “Public Key Token” of the dll file deployed in assembly. Right click on the dll and copy the “Public Key Token”.
Code in Workflow.xml file
1. Open workflow.xml file. Right click and insert code snippet of workflow.xml file.
2. Change the “workflow Id” by creating the new guid using “Create Guid” in Tools menu of Visual studio.
3. Give appropriate Name and Description to the workflow.
4. For “CodeBesideClass” property, set value as your “Namespace.Class name”.
5. For “CodeBesideAssembly” property, set value as “Assembly,Version,Culture,PublicKeyToken” as shown below:.
6. Now open published InfoPath Task form in “Design Mode”.
7. Open “Properties” from “File” menu.
8. Copy value from the “ID” in the “Form Template Properties”, which is called Form URN.
9. Paste the copied Form URN in <Task0_FormURN> tag.
10. Now save all the files.
11. Open Workflow project properties.
12. Create a new snk file by clicking on “Signing” tab.
13. Go to Build Events tab and in “Post-build event command line”, change the “NODEPLOY” to “DEPLOY”
14. Now save and build the workflow solution. Workflow will be deployed as feature automatically.
15. Go to SharePoint siteàSite ActionsàSite SettingsàSite Collection Features.
16. “My Workflow” will be deployed as feature, Now activate the workflow.
17. Go to library àdocument library settings (to which workflow has to be associated).
18. Select our Custom workflow from “Select a workflow template”; give an appropriate name for the workflow. Specify “Start options” for the workflow, I have set the workflow to start when a new item is added to the document library.
19. Add a new document to the library and now workflow will be started and task will be create to the user to whom we have assigned a task in the create task activity.
20. Task will look like something below:
21. When user clicks wither “Approve” or “Reject” task will be completed.
Deploying Workflow as Feature (Project template selected from “Workflow” tab in Visual Studio):
1. Follow the steps in the section “Code in Feature.xml file” and in the section “Code in Workflow.xml file”, follow the steps from 1 to 12.
2. Now create a folder with name “My Workflow” in 12 hive (C:\ProgramFiles\Common files\Microsoft Shared\web server extensions\12\TEMPLATE\Features).
3. Copy following files
o workflow.xml
o feature.xml
o InfoPath Task form (Published) in to the folder”My workflow” created in 12 hive.
4. Now open command prompt and go to directory C:\ProgramFiles\Common files\Microsoft Shared\web server extensions\12\BIN
5. Use following command to install workflow as feature
stsadm -o installfeature –name “My Workflow” (Your feature folder name)
Activate feature
stsadm –o activatefeature –name “My Workflow” (Your feature folder name)
Now you can associate your workflow with library in site and use it.
Another way of deploying the workflow is using WSP builder that is deploying the workflow as a WSP Package(which is the preffered Production deployment process ).
Deploying Workflow as WSP Package.
1. Open your workflow solution and create a folder called “Solution”
2. Add an xml file to the folder “Solution” and name the xml file as “Manifest.xml”
3. Add the following code to the “Manifest.xml”
<?xml version="1.0" encoding="utf-8"?>
<Solution xmlns="http://schemas.microsoft.com/sharepoint/"
SolutionId="B90C9FD7-29F3-477f-A038-B4BA51FE219F">
<FeatureManifests>
<FeatureManifest Location=" MyWorkflow\feature.xml" />
</FeatureManifests>
<Assemblies>
<Assembly Location=" MyWorkflow.dll"
DeploymentTarget="GlobalAssemblyCache" />
</Assemblies>
</Solution>
4. Add new item and then select text file.
5. Rename text file to “Solution.ddf” then click “Add”
6. Code in ddf file looks lke below, “Red marked” are the Source location from where the files have to be copied and “blue marked” are the destination folder to which the files have to be copied.
7. Open command prompt and navigate to the workflow solution directoty,run the following command to create wsp file.
makecab /f Solution.ddf
8. Now wsp file can be deployed using the following commands(which can be written in bat file)
Creating bat file
1. Add new item and then select text file.
2. Rename text file to “install.bat” then click “Add”
3. Write the following code in the bat file
Echo Restart IIS Worker Process
IISRESET
@SET FEATUREDIR="C:\Program Files\Common Files\Microsoft Shared\web server extensions\12\TEMPLATE\FEATURES"
@SET STSADM="c:\program files\common files\microsoft shared\web server extensions\12\bin\stsadm"
@SET GAC="c:\program files\microsoft visual studio 8\sdk\v2.0\bin\gacutil.exe"
Echo Adding assemblies to the GAC...
%GAC% /if bin\debug\MyWorkflow.dll
Echo Copying source files to WSS \TEMPLATE directory
xcopy /e /y TEMPLATE\FEATURES\* %FEATUREDIR%
Echo adding Solution
%STSADM% -o addsolution -filename [Solution Directory Goes Here]\Myworkflow.wsp
Echo Deploying Solution
%STSADM% -o deploysolution -name Myworkflow.wsp -allowgacdeployment -force -immediate
Echo Installing feature
%STSADM% -o InstallFeature -name "MyWorklfow" -force
Echo Activating feature
%STSADM% -o ActivateFeature -name MyWorklfow -url [Site Url]
4. Save the bat file and run it.
5. Workflow gets deployed as feature and is activated as well.

Comments
Post a Comment